04-0373/A Clutch Rod Seal
For Norton Commando
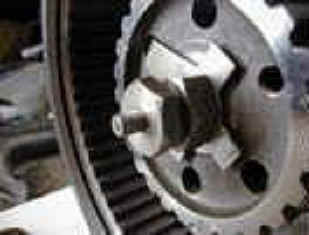
Installed
Clutch Rod Seal For Norton Commando
Article By The Manufacturer
General Information
In October of 1989, I was going to run, for the first time, my freshly overhauled 1972 Norton Commando 750 Combat. I had installed a belt drive which could run without oil in the primary, and as a matter of principle, I was going to see my new belt drive run without the cover on. I started the bike, made it fast idle to break-in the new Combat cam, and shut it down after the barrels had start to warm up. I left the bike to cool down. Upon my return, I found oil dripping out of the bottom of the clutch drum. After pulling off the clutch diaphragm spring, I found the source of the gear oil. The gearbox 90w oil was coming through the transmission main shaft.
Over the years most Commando owners will have noted the "press" in magazine articles, road tests, including the Norton News about dragging (cold) or slipping (hot) clutches. The dragging symptoms include difficulty in shifting or finding neutral, to as much as pulling the bike a little with clutch pulled in. Certainly, the problem is well known. The slipping symptoms can be a very slow slipping clutch engagements or even the motor overpowering the clutch at high speed and then the engine rpms start running away.
The actual cause, of gearbox oil on the clutch plates, may not be as universally acknowledged as one of the main sources of clutch problems. A good solution seemed to be rather elusive. After market clutch plates, or pulling the clutch apart every now and then to wash the friction plates and sand blast or emery cloth the scorched and blued steel plates did not appeal to me. I wanted a dry clutch and belt drive.
In Norton News #67 pg. 12 a clutch rod seal was made mention of, and In Oct. of 1989 I set out to develop one for my bike. I made one, installed it, and it immediately and totally stopped the leak. Some other regional Norton owners wanted seals also, so I made a small batch. I also sold some at the 1995 Norton N.Y. rally, and 1998 INOA Georgia rally. At the 1999 INOA Virginia Rally 30 seals were sold with the vocal endorsements of purchasers from the 1995 NY rally. My thanks to them! The positive feedback has been extremely good on the improvement of the clutch performance. I will continue to offer a clutch rod seal and installation instructions that will allow any Commando mechanic with a minimum of fettling and fuss to eliminate the problems associated with gearbox oil migration into the clutch.
Commonly asked Questions and Answers
1. How does it work?
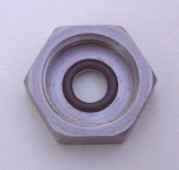
A standard O-ring is used to seal the clutch rod seal against the face of the main shaft. The seal holder is screwed onto the end of the main shaft and captures the OD of the O-ring and presses the O-ring against the face of the main shaft with a calculated amount of "squish". The seal holder is held in place with blue loctite (not supplied).2. Any limitations?
a. It has been reported that after market clutch rods are being repoped in 1/4" material. The original factory rods are 6mm. The seal is designed for 6mm rods only.
b. The only other one anticipated is if the face of the main shaft has been severely beat or hammered and degrades the ability of the seal to do it's job.3. Fettling! Why won't this just "bolt on"?
Due to the normal manufacturing variations, the shimming of the clutch basket to make it align with the crank sprocket may vary significantly. The last .140" of the main shaft threads are needed by the seal holder. If the normal clutch center nut is occupying some of this last .140", than a compromise must be achieved.4. How long does it take to install?
Typically less than half an hour, after gaining access to the inside of the clutch.5. How long does it last? The highest mileage one known of is over 20,000 miles. The belt drive clutch was opened up for inspection after 10 years and was almost bone dry, in fact the steel plates were a little rusty.
6. What if it wears out, do I have to buy a whole new one?
No, the O-ring is a standard 3/8"OD x 1/16" you can get at a NAPA car parts store for about 50 cents. Neoprene or buna-n.7. A common side effect on dry belt drives that the clutches will "chirp"on engagement similar to Ducatis'.
Part 1 - Installation
1. Using the normal procedure, dismantle the primary side as far as removal of the clutch diaphragm. You do not have to go any farther, but may remove the pressure plate to facilitate ease of access.
2. Measure the depth of your seal holder. Rev E depth = .130", identified by 3/4"hex across flats. Earlier Revs were 7/8".
3. Measure the length of the transmission main shaft that extends beyond the clutch center nut. (Also, inspect the end of the shaft for an irregular surface that may prevent sealing by the O-ring.)
4. The clutch rod seal holder must not bottom out against the clutch center nut. If measurement 2 is more than measurement 3 than see “fettling” below, otherwise continue.
5. Pull the clutch rod out of the main shaft. Typically the end with a dimple is the end that went on the ball and the flat end went on the adjuster. Polish an inch or two at the adjuster end to insure long life for the O-ring. Set aside.
***You may want to wash the gear oil off your friction and clutch plates while you're here!***
6. Clean the end of the main shaft with a suitable solvent to remove the oil so the loctite will stick. Place some blue loctite on the shaft.
7. Reinstall the clutch rod back in the main shaft.
8. Make sure the O-ring is seated in the seal holder. Slide the clutch rod seal over the shaft, slide it on and screw it down by hand. You can use a wrench to give it a little “nip” (2-3 Ft/lbs), but this seal holder only holds the O-ring in place and has not been known to come off.
9. Reassemble and lubricate the primary, and adjust the clutch according to the shop manual. Problems associated with gear grease contamination should now be a thing of past. If you have a dry belt drive put a small dab of molybdenum disulfide grease on the clutch adjusting screw.
Part 2 - FettlingFrequently there is insufficient exposed main shaft length to allow the clutch rod seal to simply screw on without interfering with the clutch center nut. A variety of areas can be looked at to achieve the required clearance.
1. Check the alignment of the clutch basket sprocket with the engine sprocket, if to far out, correct IAW shop manual. (removal of shims 06-0894 .036” or 06-0895 .048”) DO NOT PUSH THE CLUTCH BASKET IN (out of proper alignment) FOR THE SAKE OF THE SEAL!!!
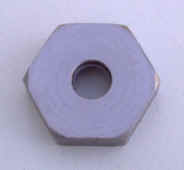
2. Use only one locking method to hold the clutch center nut. The tab washer 063459 is .043” thick and the genuine Norton split washer 063447 (040374) is .142” thick. The tab washer and loctite on the nut appears to work OK. NOTE, Earlier bikes (pre 73) did not originally come with the tab washer.
3. You may reduce the depth of the clutch seal down to .120” by grinding or filing.
Typically .140” is actually exactly two threads of engagement.4. Last, you can grind down the thickness of the clutch center nut 060895 (04373) which is .375/.383” thick. Thinner than .350" would not be typical.
5. If by this time the clearance has not been obtained, I would recommend an in-depth investigation as to why the gearbox and engine shafts are so far out of alignment.
6. A typical clutch component sketch and dimensioning can be supplied if needed.
Rev. E, 1 June 2002